
Why SSL Certificates Are Crucial for Your Website in 2025
January 21, 2025
Top 3 Reasons Your Business Needs a Wildcard SSL
January 31, 2025How to Install an SSL Certificate in 5 Easy Steps

Online security is a priority for every website, and installing an SSL Certificate is the first step to protecting your site and users. SSL Certificates (Secure Sockets Layer) encrypt data transferred between browsers and servers, boosting user trust and improving SEO rankings. Here’s a step-by-step guide to installing an SSL Certificate.
Step 1: Choose the Right SSL Certificate
Start by understanding your needs. There are different types of SSL Certificates:
● Domain Validation (DV): Basic encryption for small websites.
● Organization Validation (OV): Verifies the identity of the organization.
● Extended Validation (EV): Offers the highest level of trust with a green address bar.
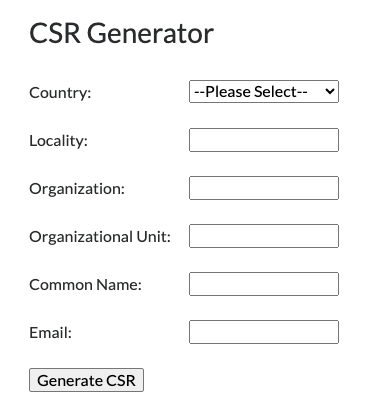
Step 2: Generate a CSR (Certificate Signing Request)
A CSR is a file required to purchase an SSL Certificate. You can generate it through your server’s control panel (e.g., cPanel, Plesk) or tools like OpenSSL. The CSR contains details about your domain and company.
Step 3: Purchase and Verify the SSL Certificate
Buy your SSL Certificate from a trusted provider like SSLGuru. After the purchase, you’ll go through a verification process, which varies depending on the type of certificate (e.g., email-based verification for DV).
Step 4: Install the Certificate on Your Server
Once you receive your SSL Certificate, download the files and upload them to your server:
● In cPanel: Go to “SSL/TLS” and upload the certificate.
● For Nginx or Apache servers: Configure your server’s settings to include the certificate files.
Step 5: Test the Installation and Enable HTTPS
Use online tools like an SSL Checker to ensure the certificate is working correctly. Then, force HTTPS by updating your .htaccess file or server configuration.
Installing an SSL Certificate might seem complicated, but it’s straightforward with the right guide! You’ll secure your site, gain user trust, and improve your SEO rankings.
Want to learn more? Visit sslguru.com to find the perfect SSL Certificate for your needs!

